Analyzing YouTube Transcripts to Uncover House-Related Issues

In a rapidly growing digital era, the ability to sift through massive amounts of data to extract specific information is not only crucial but increasingly accessible. This blog post unfolds the journey of analyzing YouTube transcripts to discover house-related issues mentioned by the previous owner of my property, who happened to be an avid YouTuber.

The Challenge

Understanding the Task

The goal was to identify potential house-related problems by analyzing a collection of text transcripts from the previous owner’s YouTube channel. The challenge was to unearth comments about problems or issues related to the house without the time-consuming process of watching each of their videos.

Initial Exploration

I didn’t really know where to start so I utilized some exploratory prompting with ChatGPT to determine the necessary components for extracting the transcripts. For example:

I want to extract the text transcripts from youtube videos with python so the content can be analyzed. what is the best way to do that?

The Approach

Here’s the eventual prompt that helped me craft a functioning script:

I'm looking to extract transcripts from a specific YouTube channel, and I need a Python script to automate the process of fetching and saving these transcripts as text files. The script must be capable of doing the following:

1. Retrieve Video IDs from a Specific Channel: Using the YouTube API (v3), the script should fetch all video IDs from a specified channel ID. It should handle pagination to retrieve all videos.
   
2. Extract Transcripts: For each video ID, use the `youtube_transcript_api` to fetch the transcript of the video. If the transcript is disabled or not found, handle these exceptions and continue to the next video.
    
3. Save Transcripts as Text Files: Each transcript should be saved as a text file, with the video ID as the filename.
    
4. Avoid Duplicates: If a transcript file already exists for a specific video ID, skip fetching the transcript for that video to avoid redundancy.
    
5. Handle Errors: If any other error occurs, log it and continue to the next video.
  
Please make sure to include necessary imports and any setup required to authenticate with the YouTube API. The final script should be a standalone program that can be executed to fetch and save the transcripts.

Note: The script should be designed with the assumption that the necessary YouTube API key and channel ID will be available as variables in the code.

Transcript Extraction Script

Here is the script ChatGPT wrote to extract the transcripts:

import os
from googleapiclient.discovery import build
from youtube_transcript_api import YouTubeTranscriptApi, TranscriptsDisabled, NoTranscriptFound

def get_channel_videos(channel_id):
    youtube = build('youtube', 'v3', developerKey=api_key)
    
    all_videos = []
    next_page_token = None
    
    while True:
        request = youtube.search().list(
            part="snippet",
            channelId=channel_id,
            maxResults=50,  # Maximum allowed by API is 50
            pageToken=next_page_token
        )
        response = request.execute()
        videos = response.get('items', [])
        
        for video in videos:
            if video['id']['kind'] == 'youtube#video':
                all_videos.append(video['id']['videoId'])

        next_page_token = response.get('nextPageToken')
        
        if next_page_token is None:
            break

    return all_videos

def save_transcript_as_text(video_id, transcript):
    with open(f"{video_id}.txt", "w", encoding='utf-8') as file:
        for entry in transcript:
            file.write(entry['text'] + '\n')

def get_transcripts(video_ids):
    for video_id in video_ids:
        # Check if transcript file already exists
        if os.path.exists(f"{video_id}.txt"):
            print(f"Transcript for video: {video_id} already exists, skipping...")
            continue
        try:
            transcript = YouTubeTranscriptApi.get_transcript(video_id)
            save_transcript_as_text(video_id, transcript)
        except TranscriptsDisabled:
            print(f"Transcripts are disabled for video: {video_id}")
            continue
        except NoTranscriptFound:
            print(f"No transcript found for video: {video_id}")
            continue
        except Exception as e:
            print(f"An error occurred for video: {video_id}, error: {str(e)}")
            continue

def main():
    video_ids = get_channel_videos(channel_id)
    get_transcripts(video_ids)

if __name__ == "__main__":
    main()

Data Ingestion

When trying to identify positive and negative statements related to specific subjects like property issues, determining the optimal chunk size and overlap is a critical step.

Chunk Size

The chunk size refers to the number of words or characters you will process at once. If it’s too small, you might miss the context or overall sentiment of a statement, especially if the speaker uses lots of run-on sentences and filler words. If it’s too large, it could create unnecessary complexity and might even encompass unrelated content.

Overlap

Overlap refers to the amount of shared text between successive chunks. If run-on sentences are frequent, overlapping can ensure that you do not lose context or split a statement related to property issues across two different chunks.

The Prompt

Determine the optimal chunk size and overlap for processing text transcriptions from English YouTube videos, with the goal of identifying positive and negative statements about a house or property, taking into consideration that the speaker uses lots of run-on sentences. The analysis should focus on problem keywords related to property issues.

Chunk Size :

  • Small Chunk (e.g., 50-100 words): Too small a chunk might break up the long run-on sentences and miss the connection between different parts of the statement.
  • Large Chunk (e.g., 1000-2000 words): This could capture the complete context but might become computationally inefficient or include unrelated information.
  • Optimal Chunk Size (e.g., 200-400 words): This middle ground should allow for capturing enough of the run-on sentences without including too much unrelated text.

Overlap :

  • Small Overlap (e.g., 10-20 words): Might miss some connections between sentences.
  • Large Overlap (e.g., 100-200 words): Ensures that statements are not split but might lead to redundancy.
  • Optimal Overlap (e.g., 40-80 words): Should allow for capturing the run-on nature of the sentences without too much repetition.

Embeddings

I leveraged Randy Lin’s chat-with-your-doc tool (https://github.com/linjungz/chat-with-your-doc) to create embeddings and ingest the transcripts.

python chat_cli.py ingest --path "./data/source_documents/*.txt" --name youtube_transcripts

After creating the embedding, the power of OpenAI’s ChatGPT could be leveraged to query the data.

python chat_cli.py chat --name youtube_transcripts

Findings

Through analysis, several positive mentions about the house were uncovered, including preferences for lighting, bedroom features, and appreciation of outdoor plants. Thankfully, nothing particularly negative was discovered.

Find all sentences that mention a house, home, residence, dwelling, property, or yard, along with a problem, damage, or issue.  Highlight examples of common problems associated with houses, such as leaks, structural damage, or renovation needs.  Analyze the context of mentions of houses and related terms to identify whether they are associated with a problem or negative situation. Determine the sentiment of sentences that contain keywords related to houses, and highlight those with negative connotations.
  1. Sentence: “It kind of got in the way of like moving around the space and like he definitely would get really annoyed with me with like having plants in the bedroom.”
    Context and Sentiment: The context of this sentence is about the speaker’s previous living situation with their ex-boyfriend and the issues that arose due to having too many plants in the bedroom. The sentiment is negative, as the speaker describes the situation as annoying and causing problems in their relationship.
  2. Sentence: “I don’t like live in a very busy neighborhood and like I kind of live on like a hill so people can’t like easily see into my house since my room or my house isn’t like level with the road.”
    Context and Sentiment: The context of this sentence is about the speaker’s house and its location on a hill. The sentiment is neutral, as the speaker is simply describing their living situation and how it affects their privacy.
Are there specific problems or issues related to houses mentioned in the transcripts?

In the transcripts, there are no specific problems or issues mentioned regarding the houses. The main issues discussed are related to having a large number of plants in the house, which caused some disagreements in a past relationship, and the echoey nature of the new house due to a lack of furniture and rugs.

was there anything the person mentioned that they liked about their house or property?

Yes, the person mentioned several things they liked about their house or property:

  1. They prefer to have the windows completely open to let in as much light as possible for their plants.
  2. Their bedroom has a king bed, beautiful windows that let in southern light, and a walk-in closet.
  3. They appreciate outdoor plants and landscapes.
was there anything mentioned about issues with privacy or neighbors?

Yes, there were mentions of privacy and neighbor-related issues in the transcripts. The person mentioned not having window coverings initially because they didn’t think they were necessary and they didn’t live in a busy neighborhood. They also mentioned living on a hill, making it difficult for people to see into their house. However, they eventually decided to get drapes for more privacy at nighttime.

Additionally, they mentioned the benefit at their new house of not having neighbors directly behind them when filming outside, as it made them feel less self-conscious. They also talked about being respectful and maintaining privacy when filming in public places, making sure not to capture other people’s faces on camera.

what is the average number of times per sentence that they say the word "like"?

I cannot calculate the exact average frequency of the word “like” being used per sentence in their conversation without knowing the total number of sentences and the total number of times “like” was used. However, it appears that the word “like” is used quite frequently in their conversation.

Conclusion

This exploration into YouTube transcripts illuminated the power of text analysis and machine learning. The complex task was simplified by innovative tools like ChatGPT and chat-with-your-doc. This method’s success suggests applications across various fields, from customer feedback to social media trends.

Acknowledgments

A heartfelt thanks to the open-source community, whose innovation and support enable remarkable projects like this.

Resurrecting a Packard Bell 486

If you’re feeling nostalgic and want to play some computer games from the late 1980’s or early 1990’s, you’re going to have trouble running them on your modern computer. Sure, there are ways to make it run, like using an emulator for example; however, that hardly compares to the full experience. It doesn’t get more realistic than when playing a game on period correct hardware. After pressing the power button, you hear the hard drive spin up to full speed. Then you hear the heads thrashing about and see the LED indicator flash in unison while the computer boots. Once the operating system has loaded, you physically insert a floppy disk, hear the seeking of the tracks, see the floppy drive LED, while waiting for the information to load. All of these tiny things add up to a truly nostalgic computing experience that you don’t quite get today.
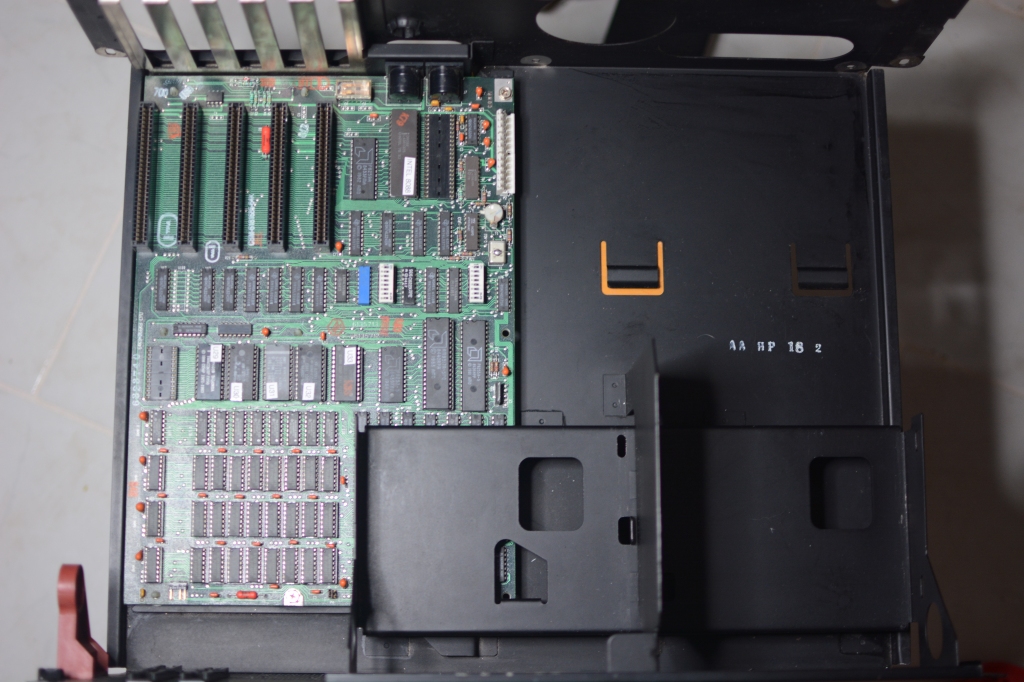
So you want to be a hero… err I mean, play old games? Sure, “Hero’s Quest” might run on a 286, but it will be awfully slow and tedious. Then there’s the CGA/EGA color pallet incompatibilities to deal with. It might run better on a 386, but if you want to maximize the number of retro games from this era that you can play on a single computer and get the best performance with the nostalgic experience, I would suggest getting a 486 class machine.

The Intel 486 CPU came in various flavors. These were the SX and DX, DX2, and DX4 models, and the main difference was that the more expensive DX contained an onboard math co-processor.

The Intel 486 SX CPU at 25 MHz, no heat sink required

Now that we have a general idea on what class of computer to get, where do we find a nearly 30 year old piece of technology? Almost any obscure thing can be found on eBay, if you’re willing to pay the price. These days (2019) a non-working 486 may go for anywhere between $100 and $800 (US) depending on its condition and accessories, not including shipping. This seems crazy being that only a few years ago, if you came across one of these machines, you wouldn’t think twice about tossing it into the e-waste bin. You really don’t want to cheap out on shipping either, as getting a further damaged computer only increases it’s chance of ending up in a land fill. If you go this route, ask the shipper to pack it as if they were going to throw it across the room, because believe it or not, that’s what happens during shipping.

After coming up empty handed a few weeks into searching for a free or reasonably priced computer, I spotted a Packard Bell Legend 125 for sale for under $100 shipped. The listing details said it had keyboard and system error preventing them from getting into the BIOS settings. Something I naively felt could be fixed relatively easily.

Back side of an uncovered Packard Bell Legend 125 (PB410A)

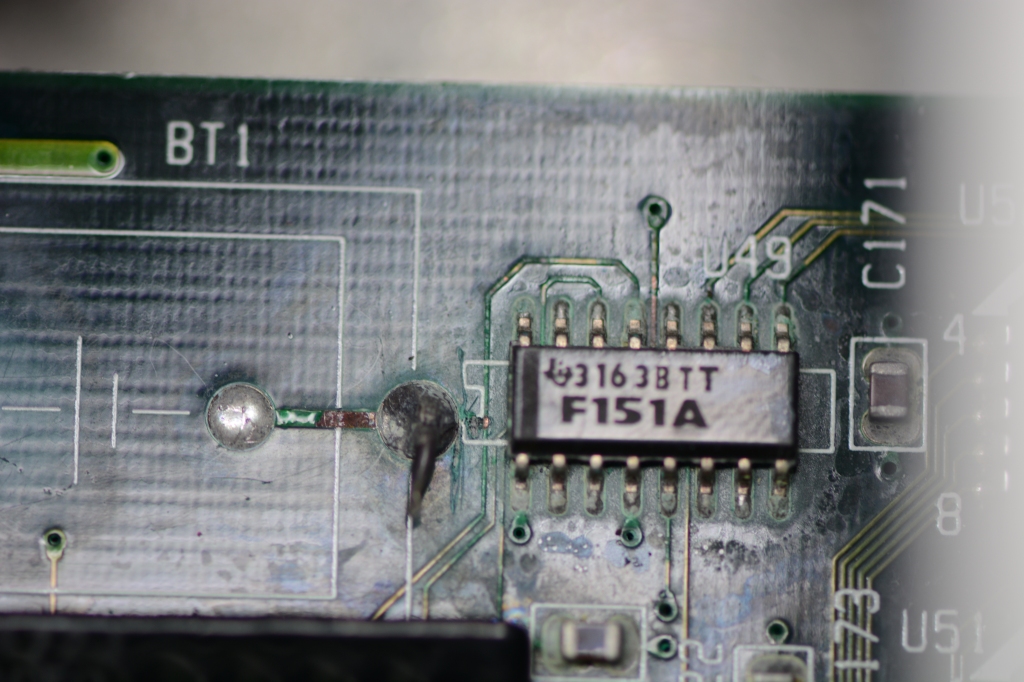
A thorough examination is necessary to become familiar with any particular system. You should check to see if any previous repairs had been done and what is the state of the components. Sometimes you need to look really closely. During the era of 386 and 486 computers it was common to use a barrel style battery (as opposed to a coin-cell) for the CMOS battery backup. Unfortunately, after 10 years or so, barrel batteries eventually ooze battery acid all over the place, and damage the circuit board. In this particular computer, it looks like a leaking battery was replaced at some point; however, they never bothered to clean up the corrosion left behind. If left untreated, the battery acid will eventually eat through the motherboard and corrode all surrounding components and traces. Immediately to the right of the battery (pictured below at U49) was a fairly corroded surface mount chip (F151A).

Battery leakage and corrosion on the computer’s mother board

Cleaning up this mess involves removing the barrel battery, so the area can be assessed and remediated. As is typical, on this board the leads were soldered directly to the battery, and they were very corroded, so I just cut them off directly at the board just to get the battery out of the way.

Packard Bell PB410 Motherboard Corrosion before cleanup.

Next, you need to neutralize the battery acid. Contrary to popular belief, battery “acid” is actually an alkaline, which is a base, so I used vinegar to clean the area, and then lightly scrubbed it with a toothbrush and a small amount of baking soda. It looks much better, but there is still some corrosion visible on a few traces.

Packard Bell PB410 Motherboard Corrosion after initial cleanup.

The F151A input multiplexer at U49 looked like it was in pretty bad shape. Continuity tests from the pins to the traces were failing.

Overview of visible corrosion from the battery leakage

After removing the battery and initially cleaning the motherboard, the computer still displayed the keyboard and system error messages. Pressing F1 to continue or F2 to enter SETUP had no effect. The keyboard was in fact recognized, since if you held a key pressed during POST, it would display the “stuck key” error. Researching online, a common theory was if the real-time-clock had no battery source, it may prevent it from proceeding.

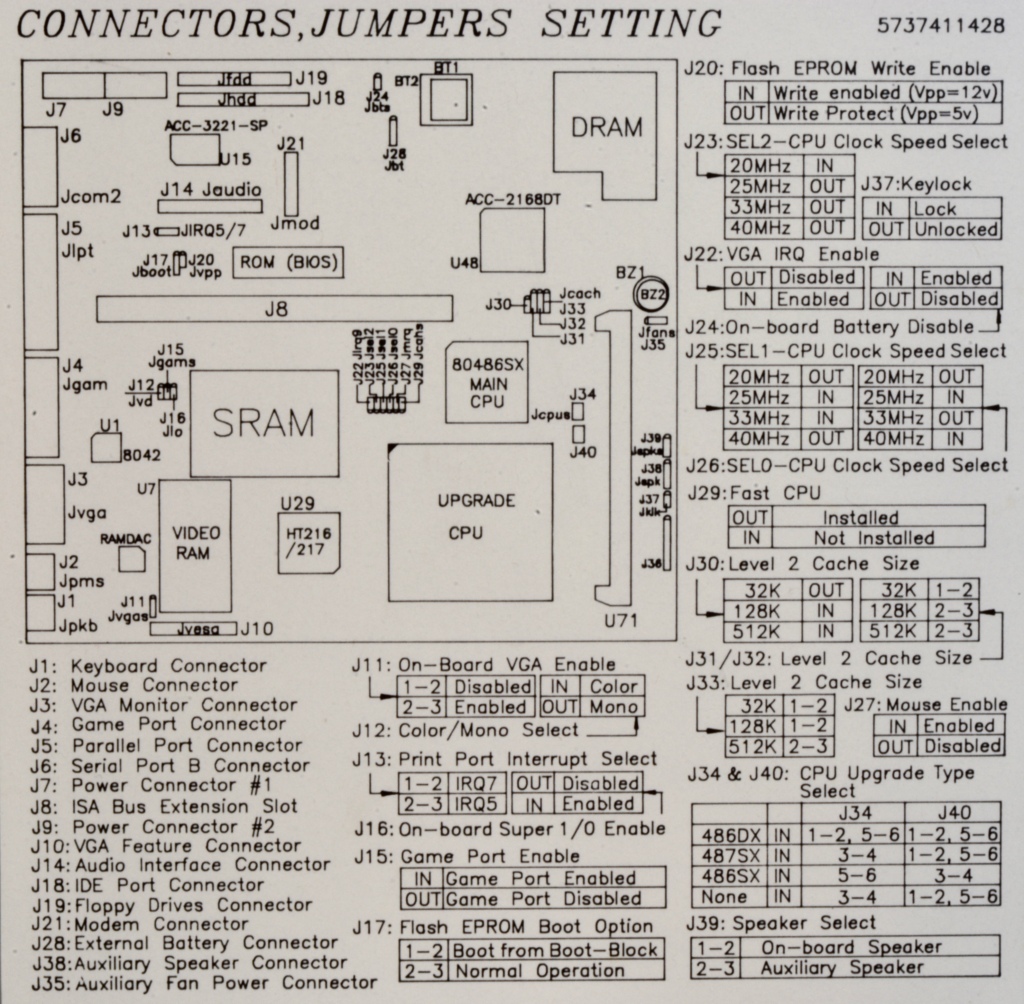
Connectors and jumper settings for the PB410 motherboard

According to the jumper settings printed inside the case, J24 enables or disables the on-board battery. Some motherboards have an option to connect an external battery source, and in this case, the battery can be connected to J28.

On this board I removed the jumper on J24 to disable the on-board battery (pictured in #1 below) and found an old PC speaker connector (pictured in #2 below) that could be used for the external battery.

External battery connector on PB410A motherboard

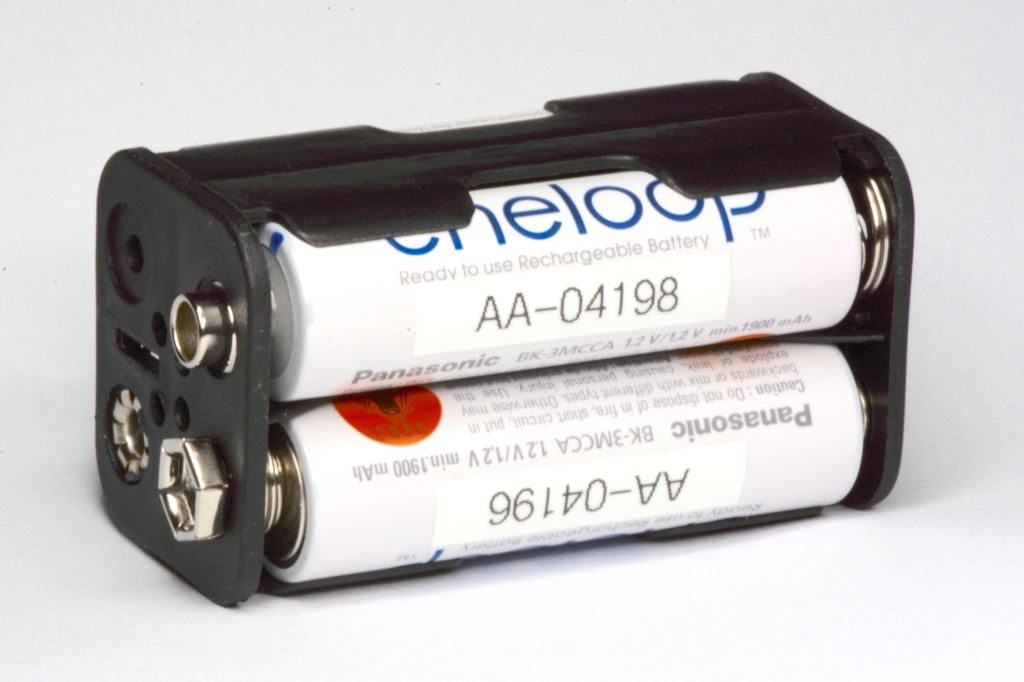
The external battery source consisted of 3 x AAA batteries providing 3.6 V to the board. Yes, I do tag and inventory all of my batteries. This set of 8 was purchased on April 2019.

External battery pack with rechargeable AA batteries

Unfortunately, even with the external battery source, the computer still would not load into the setup utility. I took the board out of the case, and started testing continuity on the traces of the corroded chip at U49. As previously mentioned, several traces in fact were severed due to corrosion.

Corroded input multiplexer at U49 directly next to where the battery was installed

Attempts to re-tin the legs of the chip were not successful due to the extent of the corrosion. As heat and flux were applied, the legs immediately deteriorated. In the process of heating up the legs, the pads (which were also heavily corroded) lifted off of the PCB. This was my first time desoldering a surface mount chip, and it definitely shows. I should have spent some more time practicing on garbage boards first.

The aftermath of removing the chip at U49, not my best work

The bottom of the chip was pretty gross. If left on the board, the corrosion would likely have spread causing further damage. Most of the pads can be seen still attached.

Bottom of U49 chip after removal from the motherboard

Because the board was so damaged (from the corrosion and from me), it was not possible to simply solder on a new chip. Not only that, but the F151A chip is no longer produced. I was able to order a SN74F151BDR which is a pin compatible replacement. I also got a small breakout board for the chip, so I could make new connections on the motherboard. The chip cost $0.64 and the breakout board was $1.25.

Replacement chip soldered onto breakout board; viewed through microscope

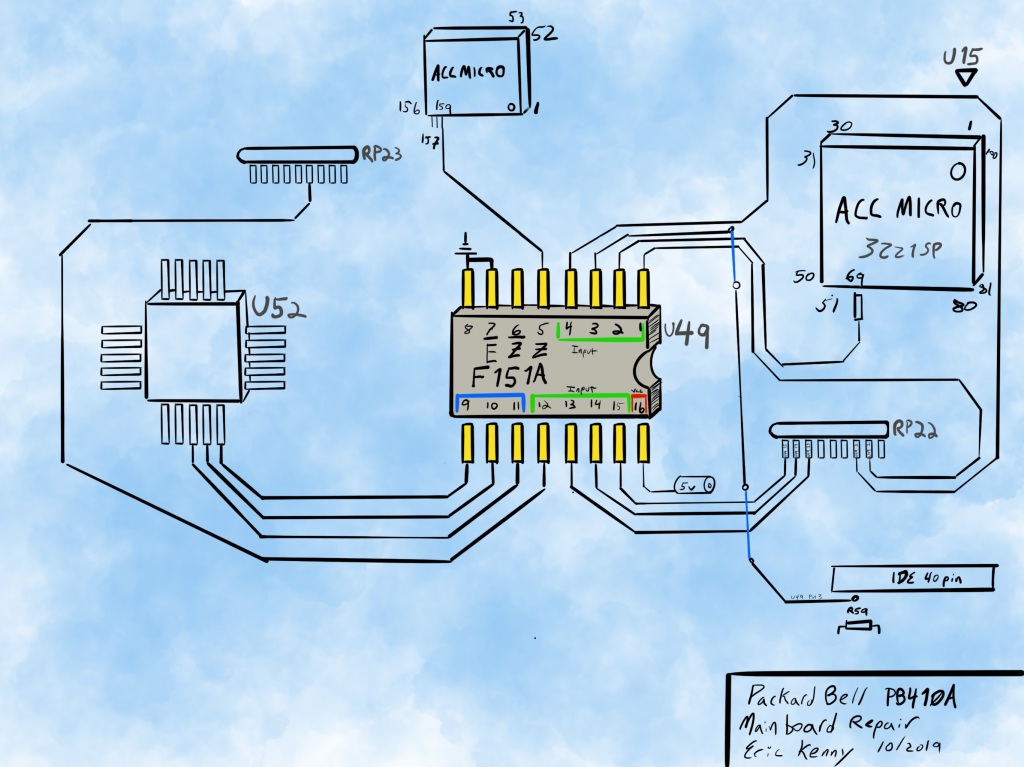
All 16 pins and traces needed to be mapped out to identify new solder points for the breakout board. This took a lot of time an patience, following the traces, testing continuity, and finding a suitable place to solder on a jumper wire. Eventually I mapped out all of the pins and began attaching the jumpers to various vias and resistor packs. Some of the pins went directly to the motherboard’s controller chips, so I had fairly high confidence that this was an important chip after all.

Schematic for U49 connections on PB410A

After triple checking the connections and that there were no solder bridges, I plugged in the power supply and did a smoke test. To my complete and utter amazement, the machine completed the POST and allowed me to enter the BIOS! Total cost of repair was under $2.00!

Now that the PC is working again, I have plans to upgrade the RAM, install some additional L2 cache, and add a storage device for an operating system.

IBM 5160 Modernized

I had come across a pre-loved IBM 5150 and 5160 that I was able to claim as my own. Unlike the 5150, the 5160 was able to successfully perform a power-on self-test (POST), but the hard drive would not spin-up. My plan for this machine was to demonstrate and experiment with early computer networking technologies. I also thought it would be a great machine to test out some “modern” upgrades as well as a few vintage accessories.

Modern Upgrades

The XT-IDE board provides a bootable IDE interface for the 8-bit ISA slots that are found in many old computers. It can also do a ton of really cool stuff. For example, you can emulate a floppy or hard disk over a serial connection to another computer.

XT-IDE ISA CompactFlash/IDE adapter

While there are versions of the XT-IDE that have a Compact Flash interface, I wanted to have the flexibility to use other IDE based devices. Also I had a couple IDE to Compact Flash adapters from an old server appliance that I could use to emulate the hard drive.

IDE to CompactFlash adapter

This 5160 has the 64KB-256KB version of the motherboard which allows up to 256KB of RAM to be installed without the need for expansion boards. If you want to max out the conventional memory to 640KB, you need to either modify the motherboard, install a vintage expansion card, or use a modern alternative. The Lo-tech 1 MB RAM board serves this purpose quite well, and easily lets you enable/disable banks of memory with the dip switches. Over time the original memory chips go bad, so this board gives you a modern reliable option.

Lo-tech 1MB RAM board

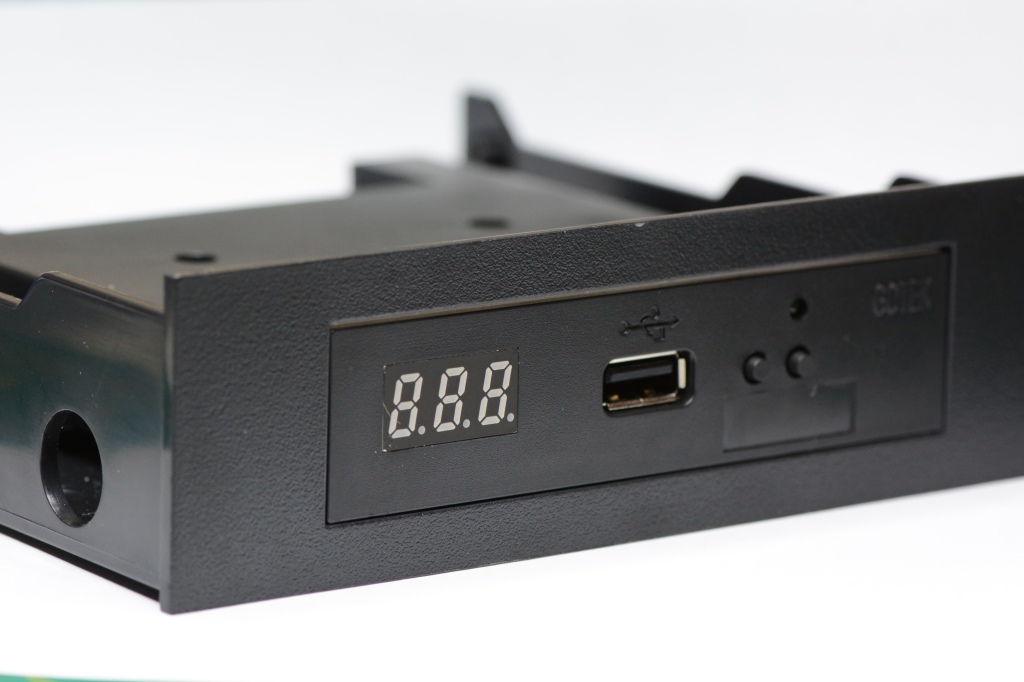
The world’s supply of 3.5 inch and 5.25 inch floppy disks has been dwindling. The fragility and finite lifespan of a floppy disk make them an unreliable method of storing data. Since floppy drives operate using very precise machinery, the drives themselves can be prone to failure if not maintained well or properly stored. That’s where the solid state floppy emulator comes in to play. The Gotek emulator appears to the system as a floppy drive and uses a USB memory stick to store up to 1,000 floppy disk images. Selector buttons on the front of the drive let you seek through to load your desired floppy disk.

Gotek floppy emulator in a 3.5 inch to 5.25 inch adapter

For the most part, the floppy emulator should work with anything that supports a floppy drive. There are some caveats though, especially in older machines like the 5160. The IBM floppy ISA card can only support 320 KB and 720KB floppy drives, the later of which is only supported on the 1986 versions of BIOS.

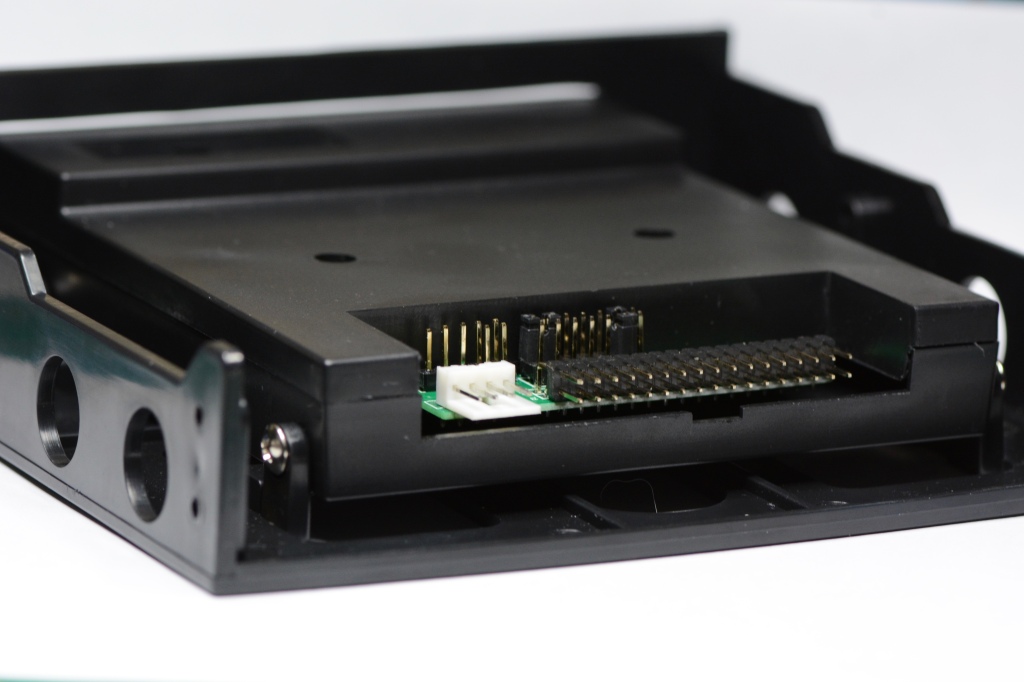
Gotek floppy emulator in a 3.5 inch to 5.25 inch adapter (back)

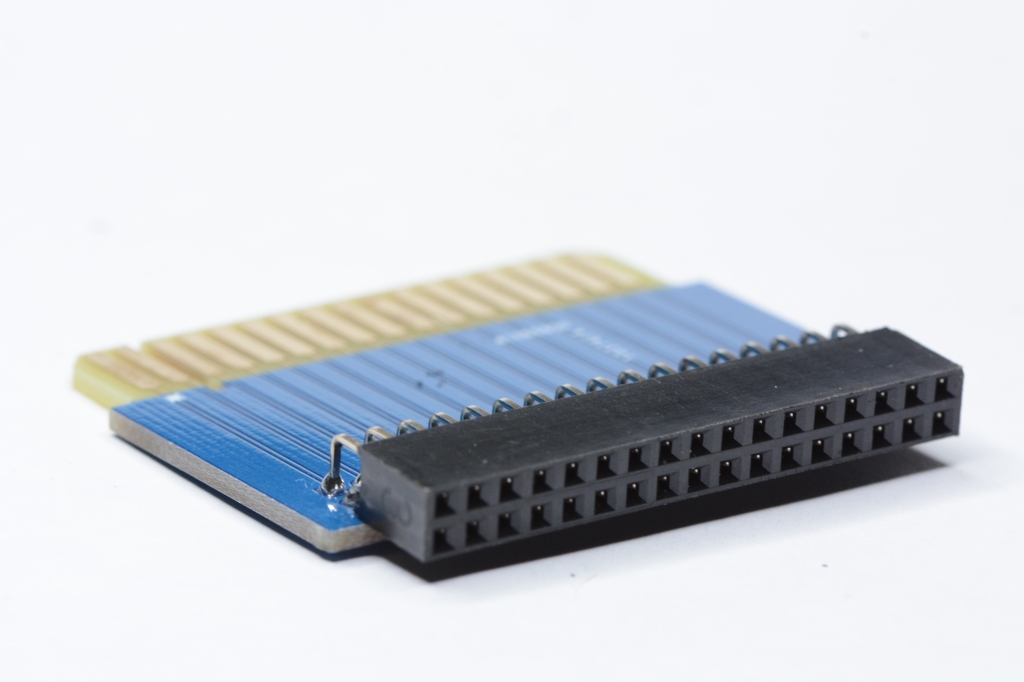
Since the floppy emulator uses the standard 34 pin floppy connector, it must be adapted to a floppy edge connector to be used in the IBM XT. You could also do this with a properly made floppy ribbon cable.

The Gotek floppy drive requires a special Windows only program to partition and write data to the USB stick. Unfortunately, the program doesn’t come in English, and it seems to only support 720KB and 1.44MB floppy images. I found that you could re-flash the floppy emulator with different firmware that gives you support for almost any type of floppy disk, even the 2.88MB images. The HxC firmware costs about $11 USD but it is well worth it for the extra features and ability to modify the drive with on-screen display, OLED informational display, and rotary interface for changing the active image.

Vintage Accessories

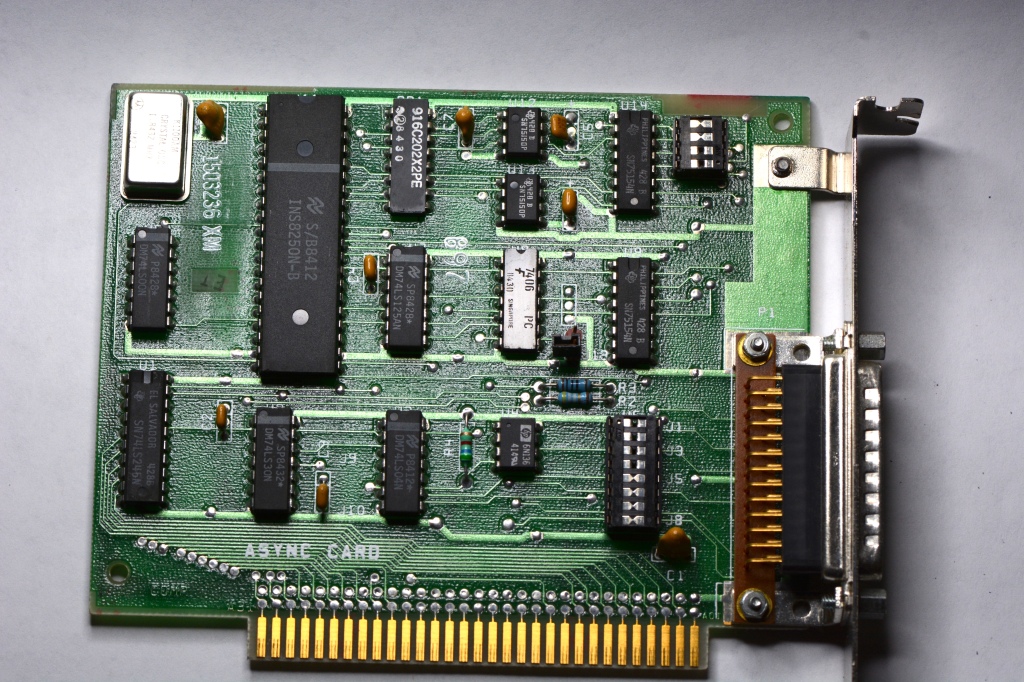
One thing the IBM XT has in common with most modern computers is that it did not come with a built-in serial port. The IBM asynchronous communication adapter provides an RS-232 interface via one 25-pin port. IBM’s technical reference manual states the maximum operating speed for this card is 9600 baud, which is probably somewhere around 9600 bps (or 1200 Bytes per second). I will be using this card to connect an external IBM 5853 modem that can operate up to 2400 bps.

IBM asynchronous serial interface card

For all super high-speed data transfers, I picked up a 3COM network interface card. It allows me to connect the IBM XT to a modern Ethernet network at a blazingly fast 10 million bits per second. It might as well be an infinite amount of bandwidth because it is certainly way more than the system bus can handle. At 4.77 MHz, the Intel 8088 CPU can drive an 8-bit ISA bus at 2.38 million bits per second (two CPU cycles per bit). Assuming you would be transferring data to/from a storage device that is also attached to the same ISA bus, then your network throughput will be even more limited.

3COM Etherlink II/16 TP 3C503 network interface card

Future Plans

I plan on covering all of these options in detail in upcoming posts, including how to configure them and make them work properly on the XT. I’m also contemplating getting an upgraded floppy drive adapter to support larger floppy images, as well as an SVGA adapter so I can use an alternative monitor.

IBM PC Restoration: Part III

When it comes to EPROMs, all I could really tell you about it is what the acronym spells out. In my quest to get the IBM 5150 working, I had exhausted my troubleshooting abilities with the minimum diagnostic configuration. To summarize, the power supply was delivering the correct voltages, but the system would not POST. The first culprit might be the RAM in bank 0. In order to get to the next step of troubleshooting, I needed to obtain a ROM burned with the Supersoft/Landmark diagnostic software. Unfortunately, I didn’t find any, so it seemed like I was going to have to burn one myself. For this, I would need an EPROM programmer.

After doing some basic research, it became clear that you need to buy a programmer that is specifically designed to work with your chip. In my not knowing anything about EPROMs, the best alternative to the Motorola MCM68766 I could find was to order a 2364 adapter so I could use the lower cost and much easier to find 27xxx series chip. I ordered the 27C256, which is a 32KB Erasable EPROM.

27C256 chip in a 2364 adapter

There has been success using these chips as alternatives to the original Motorola chip, with the caveat that since it was a larger capacity than the original 8KB ROM, it would need to be burned into each 8KB section of the 32KB ROM (4 times).

Once I determined the chip I needed to program, I was able to start researching EPROM programmers. I assembled an Arduino shield that would let me read the existing ROM chips, but later realized I could not use the 27C256 chips on it. I ended up getting a GQ-4×4 because it was cheap ($100 USD) and had a pretty large chip compatibility database. While it was supposed to support Windows 10 64 bit, I couldn’t get it to work correctly, because it kept saying the unit was unplugged from the serial interface; however, it did work correctly under Windows XP.

GQ-4×4 USB EPROM Programmer

Once I had the Supersoft ROM POST diagnostic code burned into the EPROM, I inserted it into U33 of the 5150’s motherboard, and booted it up. I also installed the CGA card with the busted tantalum capacitor. To my surprise, the ROM and the video card actually worked!

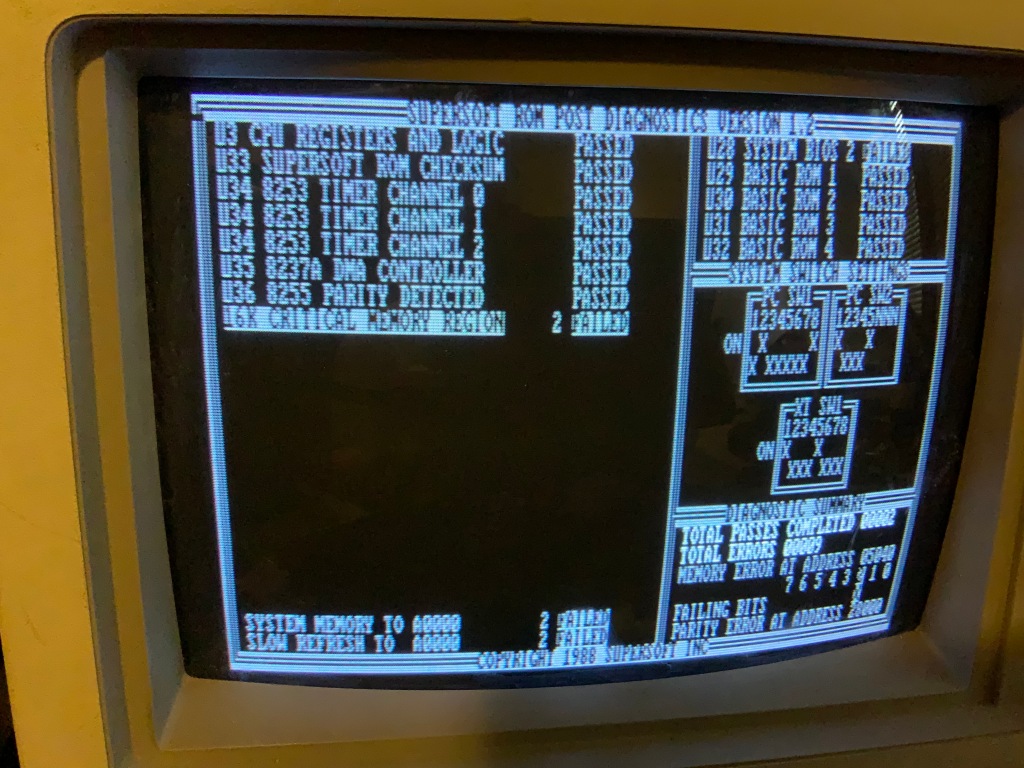
Diagnostic ROM identifies memory errors

The bad news though, it seems like almost every chip in bank 0 is faulty. Time to brush up on my de-soldering skills. Once the chips are removed from the board, I do plan on putting in a socket to make it easier to remove them in the future. So for now, it looks like the motherboard is not dead, and we just have some bad RAM.

Arduino Based EPROM Programmer

While working on restoring an old IBM 5150, I had a need to read some of the ROM chips to check their contents. I’ve assembled several (mostly) successful Arduino projects in the past so I figured I’d see if I could find an EPROM burner/programmer kit online. Not having the skill to design one myself, I took to Google and found a very helpful blog article with PCB schematics, parts list, and code to make it all work. From a parts list and a photo, I was able to piece it all together for about $60 USD.

The fully assembled EPROM programmer

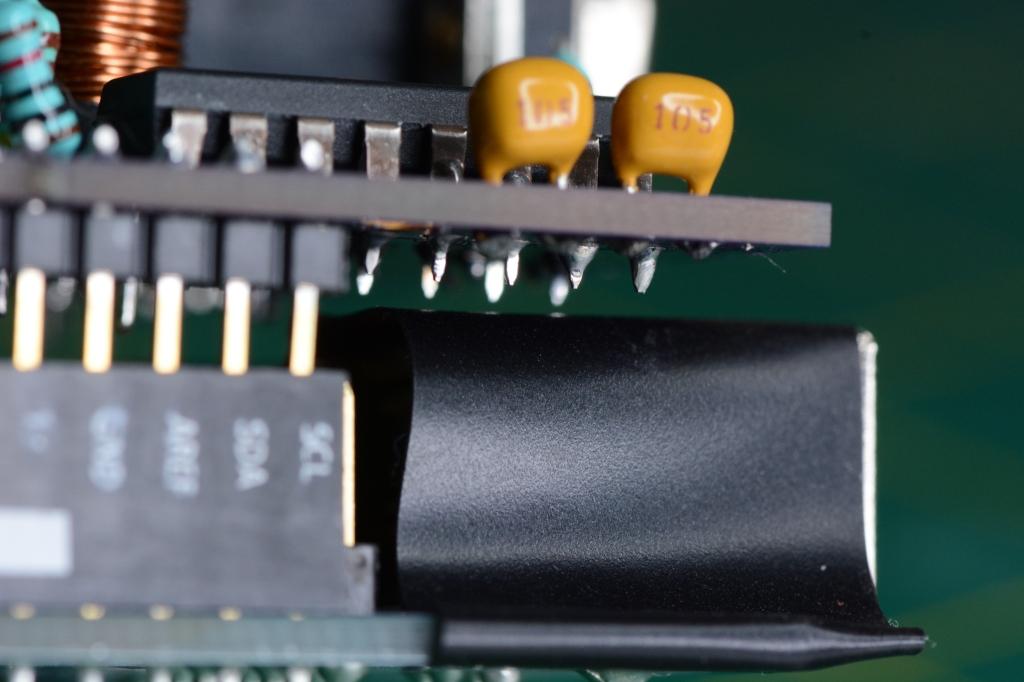
It probably would have worked the first try but the pins under the shield’s serial controller were making contact with the grounding shroud on the Arduino’s USB connector. This caused it to continuously reset about 2 times per second. Rookie move, I know. I added some electrical tape and I made sure there was enough room between the boards and that they were still able to form a good connection. The LED on the board seemed to indicate it was no longer continuously resetting.

Low clearance between the USB shroud and the Arduino shield

When time permits, I plan to update this post with more detailed instructions on assembling the board, as well as using it.

IBM PC XT Rescue: Part II

In part 1 I mentioned I picked up an old IBM 5150 and 5160 that were left for dead. When powering it up, the power supply fan turned on, but there was no RAM count or POST code displayed on the screen. There weren’t any beeps from the PC speaker either. Worst of all, I had no idea where to even begin troubleshooting since I had never worked on this type of computer before. I was able to find a scan of the manual that would have originally came with the computer. To begin troubleshooting this type of issue, the manual says you need to isolate which component is causing the computer to not work. The minimum test configuration requires only the power supply, the mother board, and the PC speaker. So I unplugged all of the other devices from the mother board, removed all of the expansion cards, and disconnected the keyboard, but still no signs of life besides the power supply fan.

IBM 5150 motherboard in minimum diagnostic configuration

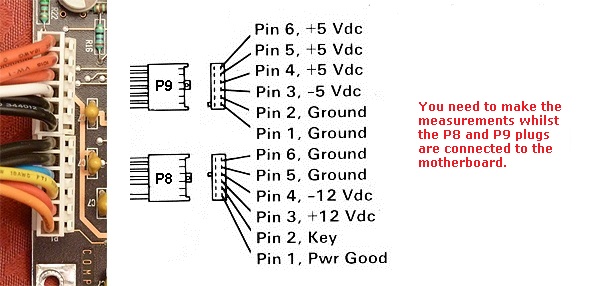
The next logical step was to make sure the power supply was actually delivering the required power. I read somewhere that if you don’t have enough load, the power-on signal would not be sent to the motherboard, so it would appear as though it was dead. Apparently the minimum diagnostic configuration provides enough load. I found in the manual the voltages that were expected to be seen and used a multi-meter to measure them. They all checked out, so at this point I figured we could rule out the power supply; however, just to be sure, I borrowed the power supply from the 5160 and ran the same test, but it yielded the same results.

There are actually several different possibilities that could make the motherboard appear dead. Based on what I could find online, several people claimed that a failure in the first bank of RAM would produce this behavior, and that it was a rather common issue. Replacing the failed RAM is not a trivial task though. In the last 3 decades, if you were to upgrade RAM in your computer, it would almost certainly have come as a “stick” of RAM. These “sticks” would have several chips soldered on to a board and the boards were inserted into slots, making them easily replaceable. This is not the case for very early computers like the 5150, where the RAM chips are socketed directly to the motherboard.

Memory chips containing 8 KB of RAM each

On this machine, each chip provides 8 KB of memory, and there are 8 chips per bank (9 if you include a chip for parity). Each bank provides 64 KB of memory. If all 4 banks are populated, this motherboard holds 256 KB of RAM! The first bank (bank 0) is soldered directly to the board, while banks 1-3 are installed into dual in-line package (DIP) sockets. The DIP sockets allow you to easily remove or replace a chip without needing to de-solder and re-solder any components. Unfortunately, if there is a bad chip in bank 0, it’s going to need to be de-soldered, and I don’t really have the proper equipment or skill for that.

Memory bank zero soldered to the motherboard of a 5150

There is a technique known as “piggy-backing” where you can place a good RAM chip on top of a bad RAM chip, and in certain cases, it will allow the computer to work. Depending on how the chip has failed, this may not always work though, and I didn’t really have any success with it. I didn’t want to risk de-soldering potentially good chips and/or damaging the board, so I looked for alternative solutions. You can replace the BIOS chip with a special diagnostic ROM that lets you perform low level tests. This will let you identify if there is a bad chip in bank 0, and will also specifically tell you which of the 9 chips are bad.

Great! So where can you get one of these diagnostic ROMs? Well if you can find a blank MCM68766 EPROM chip, and have a way to burn the firmware to it, then you’d be all set, but I had neither. After doing some more research, I found a blog post by someone that wanted to build an EPROM programmer to make ROMs for his 5150, and he ended up building one with an Arduino. He posted the code along with the PCB schematics and list of parts to build your own. I ended up opting to build the EPROM programmer from his site, rather than buy one for several reasons. What I read online is that it is very difficult to program the MCM68766 with modern EPROM burners, unless you wanted to spend upwards of $1,000 US on one, and that you had to be really careful with the cheap knockoffs. So I sent the PCB schematics off to get fabricated, and ordered most of the components online.

While I was waiting for all of the parts to arrive, I figured it would be a good time to completely disassemble the 5150 and give it a good cleaning.

A naked 5150 almost as clean as the day it left the factory

I find it helpful to take lots of pictures so I have something to reference when putting it all back together. Also, sometimes you see things in a picture that you wouldn’t normally see. For example, the CGA adapter had a burned trace that I didn’t notice until looking at a zoomed in picture. I tested continuity across the trace, and sure enough, the burn had completely severed the connection. It turns out there was a blown tantalum capacitor. For the most part though, the inside of the computer was in good shape and relatively clean considering its age.

Blown tantalum capacitor on C8 of the IBM Color Graphics Adapter

Now I just need to replace that capacitor and get the correct blank EPROMs to try out the diagnostic software, but that’s a story for another day 🙂

IBM PC XT Rescue

The IBM 5150 was one of the first computers that I used. I remember WordStar 3.30 listing out all of the documents onto the green phosphorous monochrome screen, the sound the dot matrix printer made as it churned out text onto continuously fed paper, and the stepper motors moving the heads to read disks on two 5.25 inch floppy drives. It seems like yesterday, even though it was more than 30 years ago. Unfortunately, that particular computer made its way to the dump in the mid 1990’s, and I would never see it again.

Over the last few years the “retro computing” community has peaked my interest in obtaining older computers and fixing them to run once again. As computers obsolesced, many met the same fate as my dear old 5150. Some have become so rare that they cost as much (or more) to buy than when they were brand new.

You simply cannot obtain one of these machines with all of the accessories in good working order unless you are prepared to shell out several hundred dollars. There are rare occasions when people come across them at thrift stores or yard sales where they can be had for under a $100. I have never had much luck finding any though.

A few weeks ago I happened to be driving passed a house that someone was cleaning out, and they had put a bunch of stuff out along the curb. The first items that caught my eye were two IBM XT machines stacked on top of each other, but they were not at the curb, they were up closer to the house. I immediately (and safely) pulled over and got out of the car to look. I saw a couple people inside the house and knocked on the door, because I didn’t feel comfortable taking the items that were not at the curb. I asked if they were throwing out the IBMs and if they were, I would like to restore them. They said a neighbor was going to take them to get scrapped and I immediately felt my heart sink. But before I knew it, the person had called up the neighbor and asked if it was OK if I took them to restore, and they said yes! I loaded the two IBM XTs into my trunk, along with a model F keyboard and an IBM 5153 CGA monitor. It was at that point I saw a raggedy old box with a Commodore 64, floppy drive, and cassette tape accessories. In that moment of awe, I mentioned to them how rare and awesome it was to find this stuff. Apparently they did a quick Google search and saw a Commodore 64 system listed for $750. Needless to say, they decided they wanted to keep the rest of the items and started bringing them all back into the house. I was still ecstatic about the two XTs I put in the trunk, and considered myself lucky they didn’t ask me to take them out of the car. Even though I wasn’t able to get all of the computers, at least I was able to save all of that gear from ending up as scrap metal.

Once I got the two computers, monitor, and model F keyboard home, I suited up and began the initial cleaning process. While they did look fairly clean, you never know where they were stored, what’s crawled on them, or what’s leaked into them over the last 30 years. After going through half a bottle of windex and a whole roll of paper towels, I felt they were clean enough to put up on the bench and start checking them out.

The first XT was a model 5150 and like most PCs of that era, it had several after market upgrades installed. The second XT was a model 5160 that also had several upgrades and expansions. I looked closely for any visual signs that would indicate if it would be OK to power up. For example, loose screws, missing chips, disconnected wires, or any burn marks. Everything looked as though it was in order on both computers, so I first plugged in the power to the 5150 and threw on that chunky power switch. The machine whirred to life, but alas, no beep and nothing on the screen. No problem I thought, I’ll just test out the 5160. I wired it up flipped on the power switch. This time, though, it was counting the RAM in the top left of the screen! After what seemed like an eternity, it finished counting up to 512 KB, and then after the PC speaker beep, displayed a message indicating the Operating System was missing.

This was definitely more promising, since the computer was able to successfully complete the power on self test. I thought that since they are similar enough, if I need spare parts, I can at least combine them to make a single working computer. This is when I realized I had no idea how to begin troubleshooting what could be wrong with the 5150, or how to even go about figuring out what to do, other than using the right keywords in a Google search.

Thus begins my own journey into the retro computing arena. I’m hoping in this multi-par series to share my learning experience restoring these antique machines, in case it helps someone else out there.

IPv6 Address Planning

Often I find people are hesitant to implement IPv6 because they are intimidated by the subnet planning process and therefore find it hard to get started.  In this post, I will attempt to identify some different approaches to address planning, and when it’s best to use them, as well as some best practices for allocating networks.

First off, “… to reduce the likelihood of conflict and confusion when relating documented examples to deployed systems, an IPv6 unicast address prefix is reserved for use in examples in RFCs, books, documentation, and the like. Since site-local and link-local unicast addresses have special meaning in IPv6, these addresses cannot be used in many example situations.”  See RFC 3849 for further details. Following this RFC, we will be utilizing space within the 2001:DB8::/32 for this example.

Most small sites will be able to easily obtain a /48 IPv6 network from their regional registry or a tunnel broker such as Hurricane Electric.  In this example we’ll be using 2001:DB8:1::/48 as our base supernet.  When subnetting IPv6 address blocks, it’s best to do on the 4-bit (nibble) boundaries as it makes it easier for a human to identify, plus many router’s ASICs are optimized to forward traffic this way. Generally speaking, each VLAN should be assigned a /64 allocation.  This allows for StateLess Auto-Address Configuration (SLAAC) to automatically assign addresses and to advertise available routers on the network without the use of DHCPv6.  As your network grows, your VLAN will never run out of addresses again, ever.  Traditionally IPv4 point-to-point links would utilize a /30 or /31 IPv4 subnet to make more efficient use of the space.  In IPv6 land, conservation is not needed.  Point-to-points should have an entire /64 allocated, but be configured with a /126 or /127 mask for good measure.  This prevents SLAAC from accidentally occurring.  There are many debates and opinions on this matter but within the IPv6 community, the above is generally agreed upon as best practice. 

Depending on the site’s size and requirements, there are two main ways to develop an  addressing plan:

  • Routing table optimized:  Utilizes routing summarization to decrease the size of the routing table
  • Access list optimized:  Allocates blocks to individual groups/departments regardless of their logical location on the network

Let’s cover both of these methods with practical examples.    Suppose we have a campus with approximately 50-100 buildings that is broken up into several distinct areas separated by layer 3 boundaries.  Each area has 50-100 individual VLANs that may or may not span between buildings within that region.  Each area shares the same 3-digit VLAN IDs, even though they are separated by Layer 3, which allows for easier policy enforcement for network access.  This example assumes a mobile or disperse working environment, where a department may be staffed from various locations/buildings around the campus.

Routing Optimized

First we’ll look at the routing table optimized plan.  Our allocated block of 2001:db8:1::/48 can be subnetted into 16  x /52 subnets, each of which can have 4,096 x /64 networks.  This design allows for plenty of growth with up to 16 regions, while also making the addresses easier to identify by embedding the region number along with the VLAN ID into the address.  If you are using 4-digit VLANs, you’ll likely have a much larger network, in which case, a /48 may not be enough.  If this is a requirement, get a /32 and then use 16 bits of the address to embed your 4-digit base-10 VLAN ID.  Below is a sample plan for our 4-region network:

RegionVLAN
IPv6
North Area
2001:DB8:1:1000::/52
loopbacks2001:DB8:1:1000::/64

101
2001:DB8:1:1101::/64

102
2001:DB8:1:102::/64

1032001:DB8:1:1103::/64
9992001:DB8:1:1999::/64
South Area2001:DB8:1:2000::/52
loopbacks2001:DB8:1:2000::/64
1012001:DB8:1:2101::/64
1022001:DB8:1:2102::/64
1032001:DB8:1:2103::/64
9992001:DB8:1:2999::/64
East Area2001:DB8:1:3000::/52
loopbacks2001:DB8:1:3000::/64
1012001:DB8:1:3101::/64
1022001:DB8:1:3102::/64
1032001:DB8:1:3103::/64
9992001:DB8:1:3999::/64
West Area2001:DB8:1:4000::/52
loopbacks2001:DB8:1:4000::/64
1012001:DB8:1:4101::/64
1022001:DB8:1:4102::/64
1032001:DB8:1:4103::/64
9992001:DB8:1:4999::/64

ACL Optimized

Using the same campus scenario, we can build a plan that optimizes address allocation for Access Control Lists (ACLs) simplification.  This has the drawback of dramatically increasing the size of the routing table; however, we can greatly reduce the potential number of firewall policies by assigning blocks to an individual department.  Our allocated block of 2001:db8:1::/48 can be subnetted into 4,096 x /60 subnets, each of which can have 16 x /64 networks.  This allows each group or department to have a /60 dedicated to them, so firewall policies can be more easily built permitting/denying interdepartmental traffic.  Again, we are also making the addresses easier to identify by embedding the region number along with the VLAN ID into the address, only in a different order. Up to 16 different regions/areas could be allocated for each group/department, allowing this method to scale well passed our 4-region environment. 

DepartmentVLANRegionIPv6
12001:db8:1:1010::/60
101North2001:db8:1:1011::/64
101South2001:db8:1:1012::/64
101East2001:db8:1:1013::/64
101West2001:db8:1:1014::/64
22001:db8:1:1020::/60
102North2001:db8:1:1021::/64
102South2001:db8:1:1022::/64
102East2001:db8:1:1023::/64
102West2001:db8:1:1024::/64
3
2001:db8:1:1030::/60
103North2001:db8:1:1031::/64
103South2001:db8:1:1032::/64
103East2001:db8:1:1033::/64
103West2001:db8:1:1034::/64
1992001:db8:1:1990::/60
199North2001:db8:1:1991::/64
199South2001:db8:1:1992::/64
199East2001:db8:1:1993::/64
199West2001:db8:1:1994::/64

Infrastructure

Let’s not forget, all of your network infrastructure will also require allocations for loopbacks, point-to-points, and management.  I like to block off the first and last bunch of networks in each major allocation for this purpose.  You may have noticed, with our 2001:db8:1::/48, that we didn’t start using the first available addresses.  

Documentation

You know, that thing everyone wants but nobody does?  I still see people using  spreadsheets to keep track of address allocations.  Even something is better than nothing in this case; however, the open source software phpIPAM is an excellent address management tool and is very customizable to your environment.  It take a lot of the guess work out of subnetting and gives you a clearer picture on how your allocations are structured.  

Summary

While every network has its own individual business requirements, either method of designing an IPv6 addressing plan can be leveraged to get you started.  Hopefully you’ll be able to find this information useful in planning your IPv6 deployment!

IPv6 Only Network

A few years ago I toyed with the idea of having a network without legacy IPv4 connectivity for end devices.  I also happened to recall RFC 6586 from nearly 7 years ago which discusses experiences in this exact topic.  When I last tried this experiment back in 2015, there was only one application with which I encountered a problem: The Steam desktop client.  Scavenging their forums, this was apparently a known issue since at least 2014, and was an issue they clearly had no plan on resolving.  Let’s build an IPv6 only network and see if this is still the case and if there are any other applications that don’t work.  

To reach the non-IPv6 Internet from your IPv6 only host, you’ll need two main components to translate the network traffic back and forth.  The first is Network Address Translation (NAT) and the second is a specialized DNS server that synthesizes AAAA records.  Almost everyone that has a router connecting their home network to the Internet is using NAT in some manner in order to utilize a single globally routable IPv4 address.  Different but similar, NAT64 is a NAT mechanism that embeds an IPv4 addresses within an IPv6 address.  This allows your IPv6 only traffic to get translated to IPv4 at the gateway, and then traverse the legacy Internet as usual.  To clarify, an IPv6 only device will not be able to directly speak to an IPv4 address, it must use a special address, usually in the 64:ff9b::/96 range, that has an IPv4 address inside of it so that the NAT64 device understands how to interpret the proper destination.  The DNS64 component acts as the DNS server for the IPv6 only clients.  It intercepts A records containing an IPv4 address, and synthesizes a AAAA record with the IPv4 address embedded in an IPv6 address before passing the response back to the IPv6 only device. 

Configuration

In my post about my homelab network structure, you can see more details on the underlying infrastructure being used here.  I’m using a separate VDOM for this function because I also use the FortiGate as a DNS server for the rest of my network where I don’t necessarily want to synthesize records.  The configuration on the FortiGate is fairly straightforward.  Basically you just enable the NAT64 system service and create a NAT64 policy to match the traffic you want to translate.  

Enter the system configuration for NAT64 and set the status to enable.  Additionally, you’ll want to disable the always-synthesize-aaaa-record option otherwise, native IPv6 traffic will always be translated back to IPv4.  To me it seems silly this option is enabled by default.  Why wouldn’t you want a native IPv6 connection to use IPv6?

config sys nat64
set status enable
set always-synthesize-aaaa-record disable 
end

An IP pool can be configured for 1:1 NAT but I just simplified the configuration by using the outgoing interface IP for NAT overloading.

config firewall address6
edit "v6only-vlan61"
set ip6 2001:db8:1:6061::/64
next
end
config firewall policy64
edit 1
set srcintf "vlan61"
set dstintf "v6onlyVlink1"
set srcaddr "v6only-vlan61"
set dstaddr "all"
set action accept
set schedule "always"
set service "ALL"
next
end

The VLAN that connects my IPv6-only clients to the network (VLAN 61) and provides a gateway outside also has SLAAC configured for backwards compatibility.  

config system interface
edit "vlan61"
set vdom "v6only"
set alias "v6 Only Access"
set role lan
config ipv6
set ip6-address 2001:db8:1:6061::1/64
set ip6-allowaccess ping
set ip6-send-adv enable
set ip6-other-flag enable
config ip6-prefix-list
edit 2001:db8:1:6061::/64
set autonomous-flag enable
next
end
end
set interface "internal3"
set vlanid 61
next
end

Configuring DHCPv6 is pretty straight forward too.  Most client devices (with the exception of Android) have supported DHCPv6 for many years now.

config system dhcp6 server
edit 61
set subnet 2001:db8:1:6061::/64
set interface "vlan61"
config ip-range
edit 1
set start-ip 2001:db8:1:6061::1001
set end-ip 2001:db8:1:6061::1fff
next
end
set dns-server1 2001:db8:1::60
next
end

Optionally, you can enable the DNS service which will synthesize the AAAA records, on an interface accessible from the client VLAN.  I ended up enabling the DNS server on a loopback interface, so that I could keep my DHCPv6 server configuration consistent across VLANs.  One caveat here is that on the FortiGate, you also need to have DNS listening on the client VLAN otherwise the queries are dropped.  Alternatively, you can use Google’s public DNS64 servers (2001:4860:4860::6464 and 2001:4860:4860::64), which you would specify in your DHCPv6 scope above. 

config system dns-server
edit "v6onlyLoopback"
next
edit "vlan61"
next
end

Applications Tested

For the most part, every application I tested from the IPv6-only network worked flawlessly with, the exception of the Steam desktop client application.  Note that the Steam iOS app worked just fine.

iPad iOS 9.3.5 (13G36)

AppVersion
Youtube13.45.7
Amazon11.21.2
Safari9.3.5

iPhone OS 12.1 (16B92)

AppVersion
SmartThings (Classic)2.17.1
Steam2.0.10
Signal2.31.1
Firefox14.0
Safari12.1
Waze4.45

MacOS 10.14 (18A391)

AppVersion
Google Chrome70.0.3538.102 (Official Build) (64-bit)
Firefox63.0 (64-bit)
Safari12.0 (14606.1.36.1.9)
Mail12.0 (3445.100.39)
Messages12.0 (5500)
Maps2.1 (2132.20.2.5.92)
Google Earth7.3.2.5491 (64-bit)
SteamBuilt: Nov 9 2018, at 18:51:43
Origin10.5.30.15625 – 0
Slack3.3.3

Steam Desktop Client: Still Broken

So why is the Steam desktop client so different from any other application?  Packet captures show DNS queries being made for steam services, but there are only responses containing A records. 

Other applications querying DNS for IPv4-only services show two responses including both an A and synthesized AAAA records.  If you manually query an AAAA records for one of the Steam domain names, the synthesized record appears normally:

$  dig -t aaaa @2001:4860:4860::6464 cm2-iad1.cm.steampowered.com

; <<>> DiG 9.9.5-9+deb8u16-Debian <<>> -t aaaa @2001:4860:4860::6464 cm2-iad1.cm.steampowered.com
; (1 server found)
;; global options: +cmd
;; Got answer:
;; ->>HEADER<<- opcode: QUERY, status: NOERROR, id: 36156
;; flags: qr rd ra; QUERY: 1, ANSWER: 1, AUTHORITY: 0, ADDITIONAL: 1

;; OPT PSEUDOSECTION:
; EDNS: version: 0, flags:; udp: 512
;; QUESTION SECTION:
;cm2-iad1.cm.steampowered.com. IN AAAA

;; ANSWER SECTION:
cm2-iad1.cm.steampowered.com. 10799 IN AAAA 64:ff9b::a2fe:c065

;; Query time: 77 msec
;; SERVER: 2001:4860:4860::6464#53(2001:4860:4860::6464)
;; WHEN: Sat Dec 01 08:53:50 EST 2018
;; MSG SIZE rcvd: 85

This behavior would lead me to believe that the Steam client is specifically only asking for an A record, and is not using the underlying operating system defaults for dual stack name resolution.  Why they’ve chosen to do this is unclear, as both Origin and GOG game platforms seem to work just fine.  

Summary

So it turns out, as long as you’re not a PC/Mac gamer tied to the Steam platform, you can ditch your legacy dual stack network.  I’ll be continuing to test various other devices on this network and will update the article with the results.  Other devices I plan on testing include: Xbox One, Apple TV gen 3, Amazon Alexa, Amazon Kindle Fire, and a Google Home.

Fortinet Home Lab

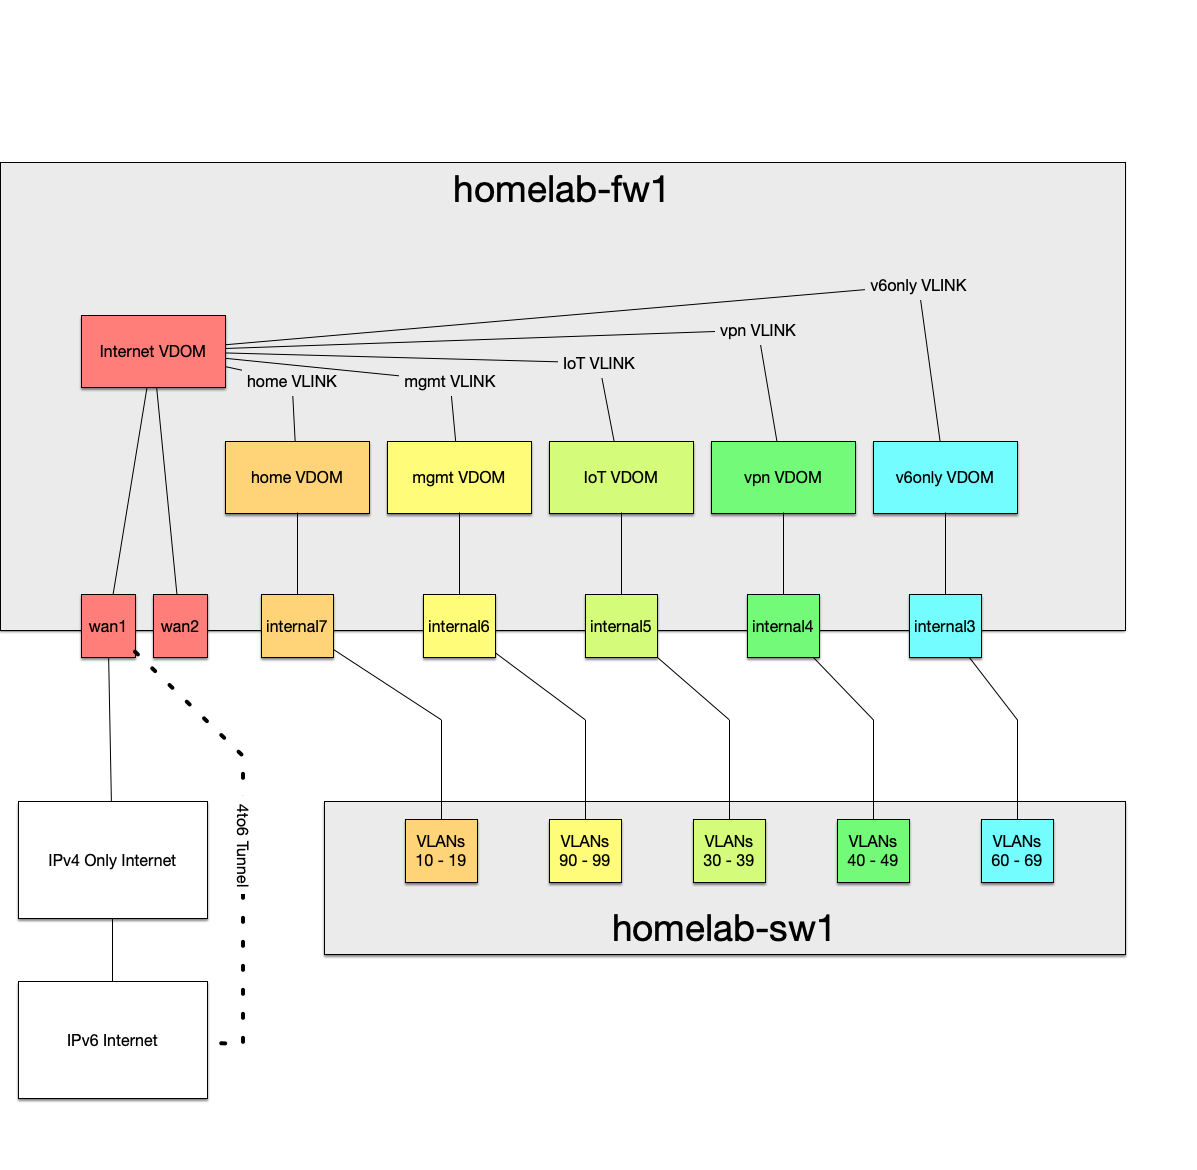
The most recent incarnation of my home lab began about a year and a half ago when I obtained a more powerful FortiGate firewall.  The entire network is quite literally centered around a FWF-61E running multiple virtual routers. In FortiLand these are referred to as Virtual Domains (VDOMs). Most people don’t really need a complicated home network setup, but I like to push technology to its limits and explore my options. Then again, most people don’t have over 60 devices on their home network.  Typically, having multiple Virtual LANs (VLANs) would suffice for traffic separation; however, utilizing VDOMs allows me to further compartmentalize network functions and gives me more flexibility for testing additional features.

To build out the configuration, I first had to decide how I wanted the network to be segregated by purpose and/or function. The main design consideration in this case involved a VDOM dedicated as a virtual transit router that would essentially be responsible for passing traffic between all other VDOMs and from those VDOMs out to the Internet.  This is accomplished using VDOM links between each VDOM and the Internet VDOM.

VDOM Structure:

  • Internet: Transit for all inter-VDOM traffic, NAT/PT, UTM
  • Home: Separate VLANs for different server networks, laptops, guests, etc.
  • Management: Administration of network equipment
  • IoT: Separate VLANs for thermostats, light bulbs, TVs, and sensors
  • VPN: Remote access and tunnels to other home networks
  • V6only: For testing DNS64/NAT64 functions and how applications handle the translation

Each VDOM is dual stack IPv4/IPv6, with the exception of the v6only VDOM, and has at least one dedicated physical interface.  Currently OSPF and OSPFv3 are being used to share routes across VDOMs.

homelab-vdoms

This configuration has allowed for greater flexibility when building test networks.  Unlike the FWF-60D, the 61E hasn’t run into any performance issues, even with all of the extra overhead.